Installing a dashcam is one of the smartest investments you can make for your vehicle’s security and your peace of mind. Whether you are protecting yourself from false insurance claims, monitoring a teen driver, or securing your car overnight with parking mode, a dashcam provides indisputable video evidence.
However, modern vehicles—especially Electric Vehicles (EVs ) and cars equipped with Advanced Driver Assistance Systems (ADAS)—require a more thoughtful approach to installation than simply plugging a cable into a cigarette lighter.
This comprehensive 2026 guide will walk you through every step of a professional-grade dashcam installation. We will cover how to seamlessly hide wires, safely route cables around airbags, hardwire your camera to the fuse box for 24/7 parking mode, and address the unique challenges of modern vehicles.
If you prefer to skip the DIY route and live in Maryland, Auto Tools Mart offers professional mobile dash cam installation services directly at your home or office.
Quick FAQ: Dashcam Installation
Will hardwiring a dashcam void my car warranty?
No. Under the Magnuson-Moss Warranty Act, installing an aftermarket accessory like a dashcam will not void your vehicle’s warranty unless the dealership can prove the installation directly caused a specific failure. Using proper fuse taps ensures a safe, reversible installation.
Where is the legal place to mount a dashcam on my windshield?
Laws vary by state, but generally, dashcams should be mounted outside the driver’s direct line of sight. A common legal standard allows a 5-inch square in the lower corner of the driver’s side or a 7-inch square in the lower corner of the passenger’s side. The safest spot is usually directly behind the rearview mirror.
Can I install a dashcam in an Electric Vehicle (EV) or Hybrid?
Yes, but EVs manage their 12V batteries differently than gas cars. Hardwiring a dashcam for parking mode in an EV requires ensuring the camera’s low-voltage cutoff is set correctly (usually 12.0V or higher) to prevent draining the smaller 12V accessory battery, which can cause the EV to throw error codes or fail to start.
Do I need to recalibrate my ADAS sensors after installing a dashcam?
If you mount the dashcam on the windshield without touching or blocking the factory ADAS camera housing (usually located behind the rearview mirror), recalibration is not required. Never mount the dashcam directly in front of the vehicle’s built-in safety sensors.
Why does my dashcam fog up or fail in the cold?
Extreme temperature changes can cause condensation inside the lens. Ensure your dashcam uses a supercapacitor rather than a lithium-ion battery, as supercapacitors are far more resilient to extreme heat and cold.
Essential Tools for a Professional Installation
Before you begin, gather the right tools. A clean, factory-look installation requires more than just your hands.
1.Trim Removal Tools: Never use a metal flathead screwdriver to pry interior panels; it will scratch the plastic and tear the fabric. A quality nylon auto trim removal tool set is essential for safely popping off A-pillar covers and tucking wires into the headliner.
2.Fuse Taps (Add-A-Circuit): These allow you to tap into an existing fuse slot safely without splicing or cutting factory wires. You will need to know your vehicle’s fuse type (Low-Profile Mini, Mini, Micro2, or ATO).
3.Circuit Tester or Multimeter: Crucial for identifying which fuses provide constant power (for parking mode) and which provide switched power (only on when the car is running).
4.Zip Ties and Electrical Tape: For securing loose cables under the dashboard so they don’t interfere with the pedals.
5.Crimping Tool or Pliers: To secure the hardwire kit wires to the fuse taps.
6.Socket Wrench: To secure the ground wire to a bare metal bolt on the vehicle’s chassis.
Step 1: Choosing the Perfect Mounting Location
The goal is to mount the dashcam where it captures a wide, unobstructed view of the road without creating a blind spot for the driver.
Front Camera Placement
The optimal location is high up on the windshield, directly behind or slightly to the passenger side of the rearview mirror.
•Check Wiper Clearance: Ensure the lens is within the area swept by your windshield wipers. If you mount it too high, rain or snow will obscure the footage.
•Avoid ADAS Sensors: Modern vehicles have bulky plastic housings behind the mirror containing cameras for lane-keep assist and automatic braking. Mount your dashcam below or to the side of this housing, ensuring the dashcam’s lens does not block the vehicle’s sensors.
•Legal Compliance: Verify your state’s specific laws regarding windshield obstructions.
Rear Camera Placement (For Dual-Channel Systems)
Mount the rear camera at the top center of the rear windshield.
•Defroster Lines: Try to position the lens between the rear defroster grid lines so the orange wires don’t blur the video.
•Hatchbacks and SUVs: If your rear window opens upwards, ensure you leave enough slack in the cable at the hinge point so the wire doesn’t snap when the trunk is opened.
Step 2: Routing and Hiding the Cables
A dangling wire across your dashboard is unsightly and dangerous. Hiding the wires is easier than it looks if you use the right technique.
Routing the Front Camera Cable
1.The Headliner: Start at the dashcam. Leave a few inches of slack and push the power cable up into the gap between the windshield glass and the fabric headliner. Use your nylon trim removal tool to gently pry the headliner down just enough to tuck the wire inside.
2.The A-Pillar (CRITICAL SAFETY STEP): Route the cable across the headliner to the passenger side A-pillar (the post between the windshield and the side window). Warning: Most modern cars have side curtain airbags inside the A-pillar. You must route the dashcam cable behind the airbag, not over it. If the airbag deploys, a cable routed over it becomes a dangerous projectile. Carefully pop off the A-pillar trim cover using your trim tool, secure the dashcam cable to the existing factory wiring harness using zip ties, and replace the cover.
3.Down to the Fuse Box: Continue routing the cable down the side of the dashboard, tucking it behind the rubber weatherstripping along the door frame. Bring the cable under the glovebox or dashboard toward the interior fuse box (usually located in the passenger footwell or under the driver’s side steering column).
Routing the Rear Camera Cable
1.Plug the rear camera cable into the front dashcam unit.
2.Route it along the headliner, past the A-pillar, and continue tucking it into the headliner or the rubber door seals along the B-pillar and C-pillar all the way to the back of the vehicle.
3.For SUVs and hatchbacks, route the cable through the flexible rubber grommet (the conduit connecting the body to the liftgate) for a completely waterproof and factory-look finish.
Step 3: Hardwiring to the Fuse Box (For Parking Mode)
While you can plug your dashcam into a 12V cigarette lighter socket, hardwiring is the only way to achieve a clean look and enable 24/7 parking mode surveillance.
A standard hardwire kit has three wires:
•Red (Battery/Constant): Provides power when the car is off.
•Yellow (ACC/Switched): Tells the camera when the car is turned on or off.
•Black (Ground): Completes the electrical circuit.
(Note: Always check your specific hardwire kit’s manual, as some brands reverse the red and yellow wire functions).
Finding the Right Fuses
Consult your vehicle’s owner’s manual to locate the interior fuse box diagram. You are looking for non-critical fuses rated between 10A and 30A.
•Good choices: Radio, cigarette lighter, power seats, sunroof, rear wiper.
•Bad choices (DO NOT USE): Airbags (SRS), ECU, fuel pump, ABS, horn.
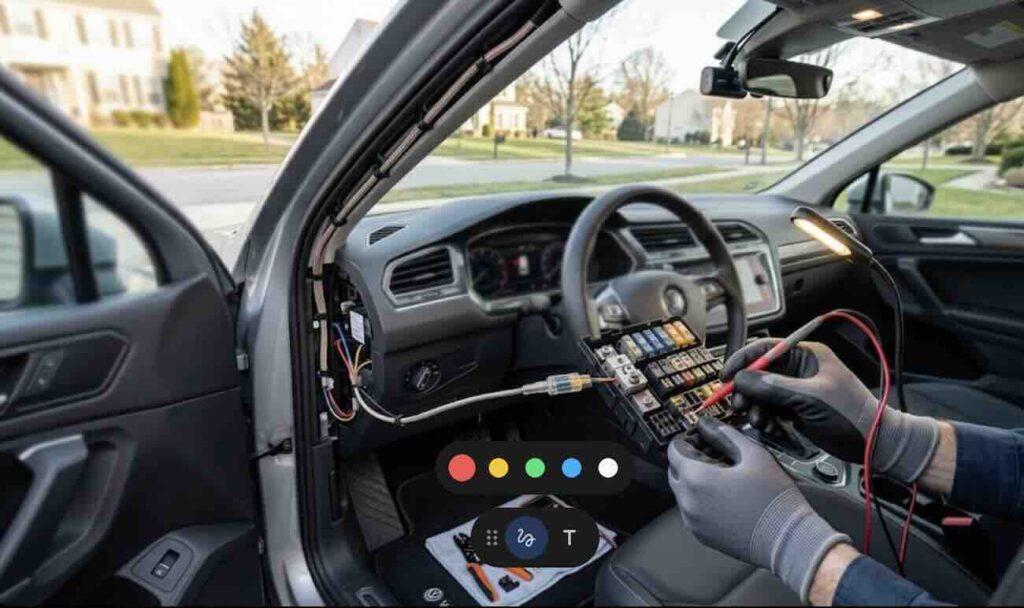
1.Locate a Constant Fuse (VCC): With the car completely turned off and the keys removed, use your circuit tester on the exposed metal tabs of the fuses. Find a fuse that lights up the tester. This fuse has constant power.
2.Locate a Switched Fuse (ACC): Find a fuse that does not light up when the car is off, but does light up when you turn the ignition to the “Accessory” or “On” position.
Installing the Fuse Taps
1.Use pliers or a fuse puller to remove the constant fuse you identified.
2. Insert that original factory fuse into the lower slot of your fuse tap (the slot closest to the metal prongs).
3.Insert the new fuse provided with your hardwire kit into the upper slot of the fuse tap.
4.Crimp the Red wire from your hardwire kit to the end of this fuse tap.
5.Plug the fuse tap back into the empty slot in the fuse box.
6.Repeat this exact process for the Switched (ACC) fuse, connecting it to the Yellow wire.
Connecting the Ground Wire
Locate a bare, unpainted metal bolt connected directly to the vehicle’s metal chassis near the fuse box. Loosen the bolt with a socket wrench, slide the C-shaped connector of the Black ground wire underneath, and tighten the bolt securely. A loose ground is the #1 cause of dashcams randomly restarting.
Step 4: EV and Hybrid Specific Considerations
Electric Vehicles (such as Tesla, Mustang Mach-E, and Hyundai Ioniq 5) and Hybrids present unique challenges for dashcam hardwiring.
While the massive high-voltage battery pack powers the motors, the vehicle’s computers, lights, and accessories are still powered by a standard, much smaller 12V lead-acid or lithium-ion battery.
The 12V Battery Drain Issue:
If a dashcam draws too much power in parking mode, it can quickly drain an EV’s small 12V battery. When the 12V battery dies in an EV, the car is completely “bricked”—you cannot even unlock the doors or start the high-voltage system to recharge it.
The Solution:
1. Voltage Cutoff Settings: Ensure your hardwire kit has an adjustable low-voltage cutoff switch. Set it to a conservative level (e.g., 12.0V or 12.2V) so the dashcam shuts off before the 12V battery is depleted.
2. Dedicated Dashcam Battery Packs: For EVs, the safest and most reliable method for parking mode is installing a dedicated LiFePO4 dashcam battery pack (like the BlackboxMyCar PowerCell 8). The battery pack charges only when the EV is driving and powers the dashcam when parked, completely isolating the dashcam from the EV’s delicate 12V system.
Step 5: Final Testing and Cable Managemen
Before you put all the interior panels back together, test the system.
1. Turn the ignition on. The dashcam should power up and begin recording.
2. Turn the ignition off. The dashcam should announce that it is entering “Parking Mode” (or the screen should turn off while the recording LED stays active, depending on the model).
3. Check the camera angles using the dashcam’s screen or smartphone app. Ensure the horizon is level and the hood of your car is barely visible at the bottom of the frame.
4. Once confirmed, use zip ties to bundle any excess wire near the fuse box. Secure the bundle high up under the dashboard so it cannot drop down and interfere with the brake or gas pedals.
5. Reinstall any weatherstripping or plastic trim panels you removed.
Conclusion
A hardwired dashcam installation provides a seamless, professional look and unlocks the crucial 24/7 parking mode feature. By using the right tools like trim removers and fuse taps, routing cables safely around airbags, and understanding the specific electrical needs of your vehicle, you can achieve a factory-quality install.
If you are in Maryland and prefer to leave the wiring to the experts, Auto Tools Mart provides professional, mobile dashcam installation services. We come to your home or office to ensure a clean, safe, and warranty-compliant setup. Call us today at 443-204-1972 or email sales@autotoolsmart.com to schedule your installation.